Originally published January 2026 | Updated March 2026
So we just bought an akiya house in Japan. We opened the door, key in hand, stepped inside, then remembered, right… The house was still full of the previous owner’s belongings.
Everyday household trash can go out with the weekly city pickup, but we’re dealing with decades’ worth of belongings — kitchen items, old furniture, broken appliances and electronics — the kind of volume and material that regular garbage collection simply won’t take.
So what do you do?
As we begin this akiya renovation (and if you’re tackling one yourself), I’ve put together this guide to walk you through exactly how Japan’s waste centers and incineration facilities work, how much it costs, where to recycle electronics, and how to navigate the system, step-by-step without feeling overwhelmed.
- What Are The Waste Centers in Japan?
- Burnable Garbage (可燃ごみ)
- Non-Burnable Garbage (不燃ごみ)
- Oversized Garbage (粗大ごみ)
- How to Dispose of Household Garbage
- Construction Waste
- Electronics Recycling in Japan (家電リサイクル)
- Step-by-Step Guide on Using a Waste Facility
- Before Your First Dump Run: A Quick Checklist
- Municipal Garbage Pickup in Japan
- Final Thoughts: Plan for Garbage Like It’s a Renovation Phase
- Garbage Disposal FAQ
What Are The Waste Centers in Japan?
Japan uses both landfills and incineration, but it’s especially known for its high-temperature incineration facilities. In fact, roughly 70–80% of municipal solid waste in Japan is incinerated, one of the highest rates among developed countries.
These plants often function as waste-to-energy facilities, burning household waste while capturing heat to generate electricity or supply local heating systems. They also use advanced filtration and emission-control systems to reduce environmental impact.
Incineration plants are typically operated by local governments and go by different names, such as:
- Environmental Center (環境センター / Kankyō sentā)
- Clean Center (クリーンセンター / Kurīnsentā)
- Cleaning Factory (清掃工場 / Seisō Kōjō)
Privately owned landfill-type facilities are sometimes called Recycling Centers (リサイクルセンター).
The name may vary, but the general function is similar — though what each facility accepts can differ by location. (Check the facility’s website or call ahead to confirm exactly what they accept before loading your vehicle.)
Typically, staff will direct you to designated drop-off zones depending on the material, then you’ll be responsible for unloading everything.
Japan’s waste system is also famously strict and incredibly organized. In general, household garbage is separated into these categories:
- Burnable garbage (可燃ごみ)
- Non-burnable garbage (不燃ごみ)
- Oversized items (粗大ごみ / sodai gomi)
- Electronics and appliances
Below is an example of what is accepted (yellow) and what isn’t (red) in Kyoto’s Miyazu City.
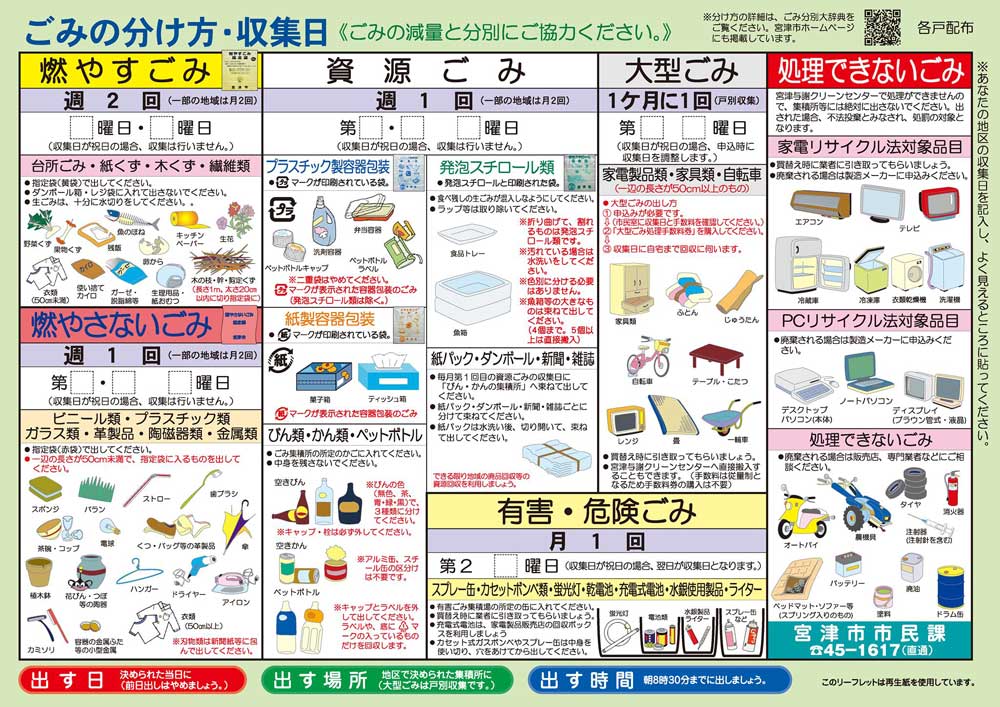
A quick lesson on organization: Our first dump run included a mixed bag of household garbage and drywall chipboard — so imagine our surprise (and embarrassment) when we were told it all had to be sorted! Luckily, the staff handed us a guide on sorting materials and a list of specialized disposal sites. After that, we never made the same mistake again.
Burnable Garbage (可燃ごみ)
Burnable garbage (可燃ごみ, moeru gomi) consists of everyday household items that can be safely incinerated, from:
- Food Waste: Kitchen scraps and leftovers.
- Paper Goods: Tissues, paper scraps, and dirty cardboard that cannot be recycled.
- Small Plastics: Plastic wrap, food containers, and bags (check if your city requires these in “Recyclable Plastics” instead).
- Rubber & Leather: Old shoes, bags, and belts (with metal removed)
- Sanitary Items: Diapers, pet waste, and feminine hygiene products.
Non-Burnable Garbage (不燃ごみ)
Non-burnable (不燃ごみ, moenai gomi) consists of items that cannot be incinerated or may release toxic fumes if burned. For example:
- Glass & Ceramics: Broken glasses, plates, light bulbs, and pottery.
- Metals: Aluminum foil, pots, pans, and cutlery.
- Small Electronics: Small appliances like hair dryers or clocks (larger items will require “Oversized Garbage” pickup).
- Hazardous Items: Empty spray cans, gas canisters, and lighters (these often require specific handling for safety).
- Miscellaneous: Umbrellas and certain types of hard plastics.
Oversized Garbage (粗大ごみ)
Generally, any item oversized garbage (粗大ごみ, sodai gomi) exceeding 30cm to 50cm on any side is classified as such. This includes:
- Furniture (desks, chairs, sofas)
- Bicycles
- Mattresses
- Large suitcases
- Tatami Floors

How to Dispose of Household Garbage
When it comes to clearing out a house, especially an akiya, you generally have three main options:
Bring It Yourself to the Disposal Facility (Cheapest Option)
If you have access to a vehicle, you can transport the waste directly to the regional disposal facility listed on your municipal website.
Most cities operate a regional environmental center that accepts:
- Burnable garbage
- Non-burnable garbage
- Recyclables
- Bulky garbage
Fees are typically weight-based. For example, some centers charge around ¥50 to ¥300 per 10 kg, making this by far the most economical option if you’re willing to sort and haul everything yourself.
One complication: many municipal incinerators and disposal sites accept waste only from local residents. You may be required to be a registered resident of the city or town by showing ID with a local address.
This can be a major hurdle if:
- You’re purchasing from overseas
- You haven’t moved in yet
- Your residence card still shows a previous address
One thing you can do is bring a copy of your real estate registration certificate (不動産登記権利情報). It shows the property address and can be accepted as proof of your local address, even if your ID doesn’t show it.
Request Municipal Bulky Garbage Collection
If transporting items yourself isn’t realistic, you can request collection through your city hall’s Garbage Division or Environmental Conservation Division.
However, keep in mind:
- Many municipalities only collect oversized garbage (sodai gomi)
- Reservations must be made in advance
- You’ll pay a processing fee per item
- There is often an additional truck transportation fee
Those per-item fees add up quickly (I found one example where each item was charged ¥500 per item. Imagine the total cost with a house full of things!)
Oversized trash is often collected once a year or with advance notice (via phone or online) to your local Sodai Gomi Center to schedule a pickup date. You’ll need to purchase “Waste Disposal Tickets” (stickers) at a local convenience store (prices vary by item) and attach the sticker to your item.
Hire an Approved Local Disposal Company
Most municipal websites list licensed private disposal companies. These companies will:
- Handle sorting
- Provide labor
- Remove large quantities at once
This is the most convenient option — and often the fastest — but also one of the most expensive. It’s typically best for full house clear-outs or when time is limited.
In one case I found, a team of three workers for seven hours to clear out a 2LDK apartment that contained furniture, appliances, and household goods, (including dismantling shelving and separating scrap wood and cardboard) came to ¥253,000 overall (about $1,600 USD).
Construction Waste
Waste generated during DIY and renovation projects in Japan is separated into general household waste and industrial waste (産業廃棄物 / sangyō haikibutsu).
In most small-scale, DIY renovations, waste falls under household waste. However, certain materials automatically qualify as industrial waste — especially those commonly generated through construction or commercial activity.
Japan classifies industrial waste into 20 official categories, including:
- Cinders (such as coal ash and other incineration residues)
- Sludge (such as car wash sludge, excess from wastewater treatment, etc.)
- Waste oil (mineral oil, animal and vegetable oil, cleaning oil, etc.)
- Acids (hydrochloric acid, sulfuric acid, etc.)
- Waste alkali (photographic developing solution, metal soap liquid, etc.)
- Plastics (synthetic resin waste, rubber tires, etc.)
- Rubber (raw rubber)
- Scrap metal (iron and steel, grinding waste, etc.)
- Glass, concrete, ceramic waste (gypsum board or drywall, glass plates, bricks, etc. )
- Slag (foundry waste, furnace slag, etc.)
- Construction Debris (asphalt, concrete debris, etc.)
- Soot
- Waste water (from pulp manufacturing, paper manufacturing, etc.)
- Wood chips
- Textile waste
- Animal and plant residue…
Materials like drywall, metal, and concrete are often treated as industrial waste, even if you’re doing the renovation yourself. In these cases, you’ll need to either:
- Find a licensed disposal facility through your municipal website
- or hire a certified waste collection company
One example from our experience was disposing of a half-load of broken drywall from our ceiling renovation project in our rental house. After carefully budgeting for renovation materials, we realized it cost nearly as much to dump old drywall as it did to purchase new sheets.
If you’re hiring, there is one case where hiring two workers for five hours to demolish a small storage shed, including the disposal of construction materials such as scrap metal, cost around ¥120,000 (about $760 USD).
And this is where costs can climb quickly.
That single dump run was enough to make us painfully aware of every off-cut and mistake.
Electronics Recycling in Japan (家電リサイクル)
In Japan, recycling electronics falls under 家電リサイクル (kaden risaikuru) — literally “home appliance recycling.” But how you dispose of something depends entirely on the item’s size and type.
Most cities and municipal websites outline:
- Drop-off box locations for small electronics
- Licensed recycling facilities
- Local rules and fees
Because details vary slightly by municipality, your city’s website is always the most accurate source.
Small Electronics (小型家電)
For small electronic items — such as:
- Phones
- Cameras
- Radios
- Calculators
- Hair dryers
Many towns have permanent collection boxes where you can drop these off for free.
When using the collection boxes, make sure to remove batteries beforehand. Size limits vary by municipality, but items typically must be around 25cm × 15cm or smaller to fit in the deposit slot. These boxes are often located at city halls, community centers, libraries, or large supermarkets.
Technically, these items can also fall under the category of “non-burnable” garbage. However, in recent years, there has been a nationwide push to recycle small electronics because they contain valuable and precious metals, which is why many municipalities now offer free collection boxes.
Large Appliances
When it comes to larger appliances, disposal becomes more regulated. Under Japan’s Home Appliance Recycling Law (家電リサイクル法), the following four categories must be recycled through a special system:
- Air conditioners
- Televisions (LCD, plasma, CRT)
- Refrigerators/freezers
- Washing machines (including clothes dryers)
You cannot simply throw these out with regular bulky trash.
How to Get Rid of the “Big 4” Appliances in Japan
Option 1: Ask the Store
The first option is to ask the store where the appliance was originally purchased. Retailers are legally required to take back these items (for a fee). This typically includes:
- A recycling fee
- A transportation/collection fee
You can also go to a large electronic retailer, such as Yamada Denki (similar to Best Buy in North America). They offer recycling services for the big 4 items, with costs breaking down size and make of the appliance (fees listed on their website).
Fees depend on the size and manufacturer, but can range from around ¥4,000 (about $25 USD) for a television to ¥13,200 (about $85 USD) for an air conditioner.
Option 2: Bring It to a Designated Collection Point
If the original store no longer exists, or you don’t have access to a big retailer chain (per option 1), you can bring the appliance yourself to a designated and licensed collection point (指定引取場所).
These locations are listed on your municipal or city website. Or you can also search for collection locations using this Home Electronics Recycling map.
Before going, you’ll need to prepare the payment form. Here’s the general process:
- Go to your nearest post office.
- Fill out a Home Appliance Recycling Ticket (家電リサイクル券).
- You’ll need to fill out one ticket per item
- Include the make and size of each item.
- Each item requires an independent code. The Association of Electric Home Appliances has a form you can use to find each code and the cost of each item.
- Pay the recycling fee at the post office.
- An additional charge is included for processing the ticket. It’s ¥203 if paid at the front desk, or ¥152 if paid through the ATM.
- Bring the appliance — along with the recycling ticket/sticker — to the designated collection point.
If you need additional recycling ticket forms, you can order them from the Association for Electric Home Appliances website.

Step-by-Step Guide on Using a Waste Facility
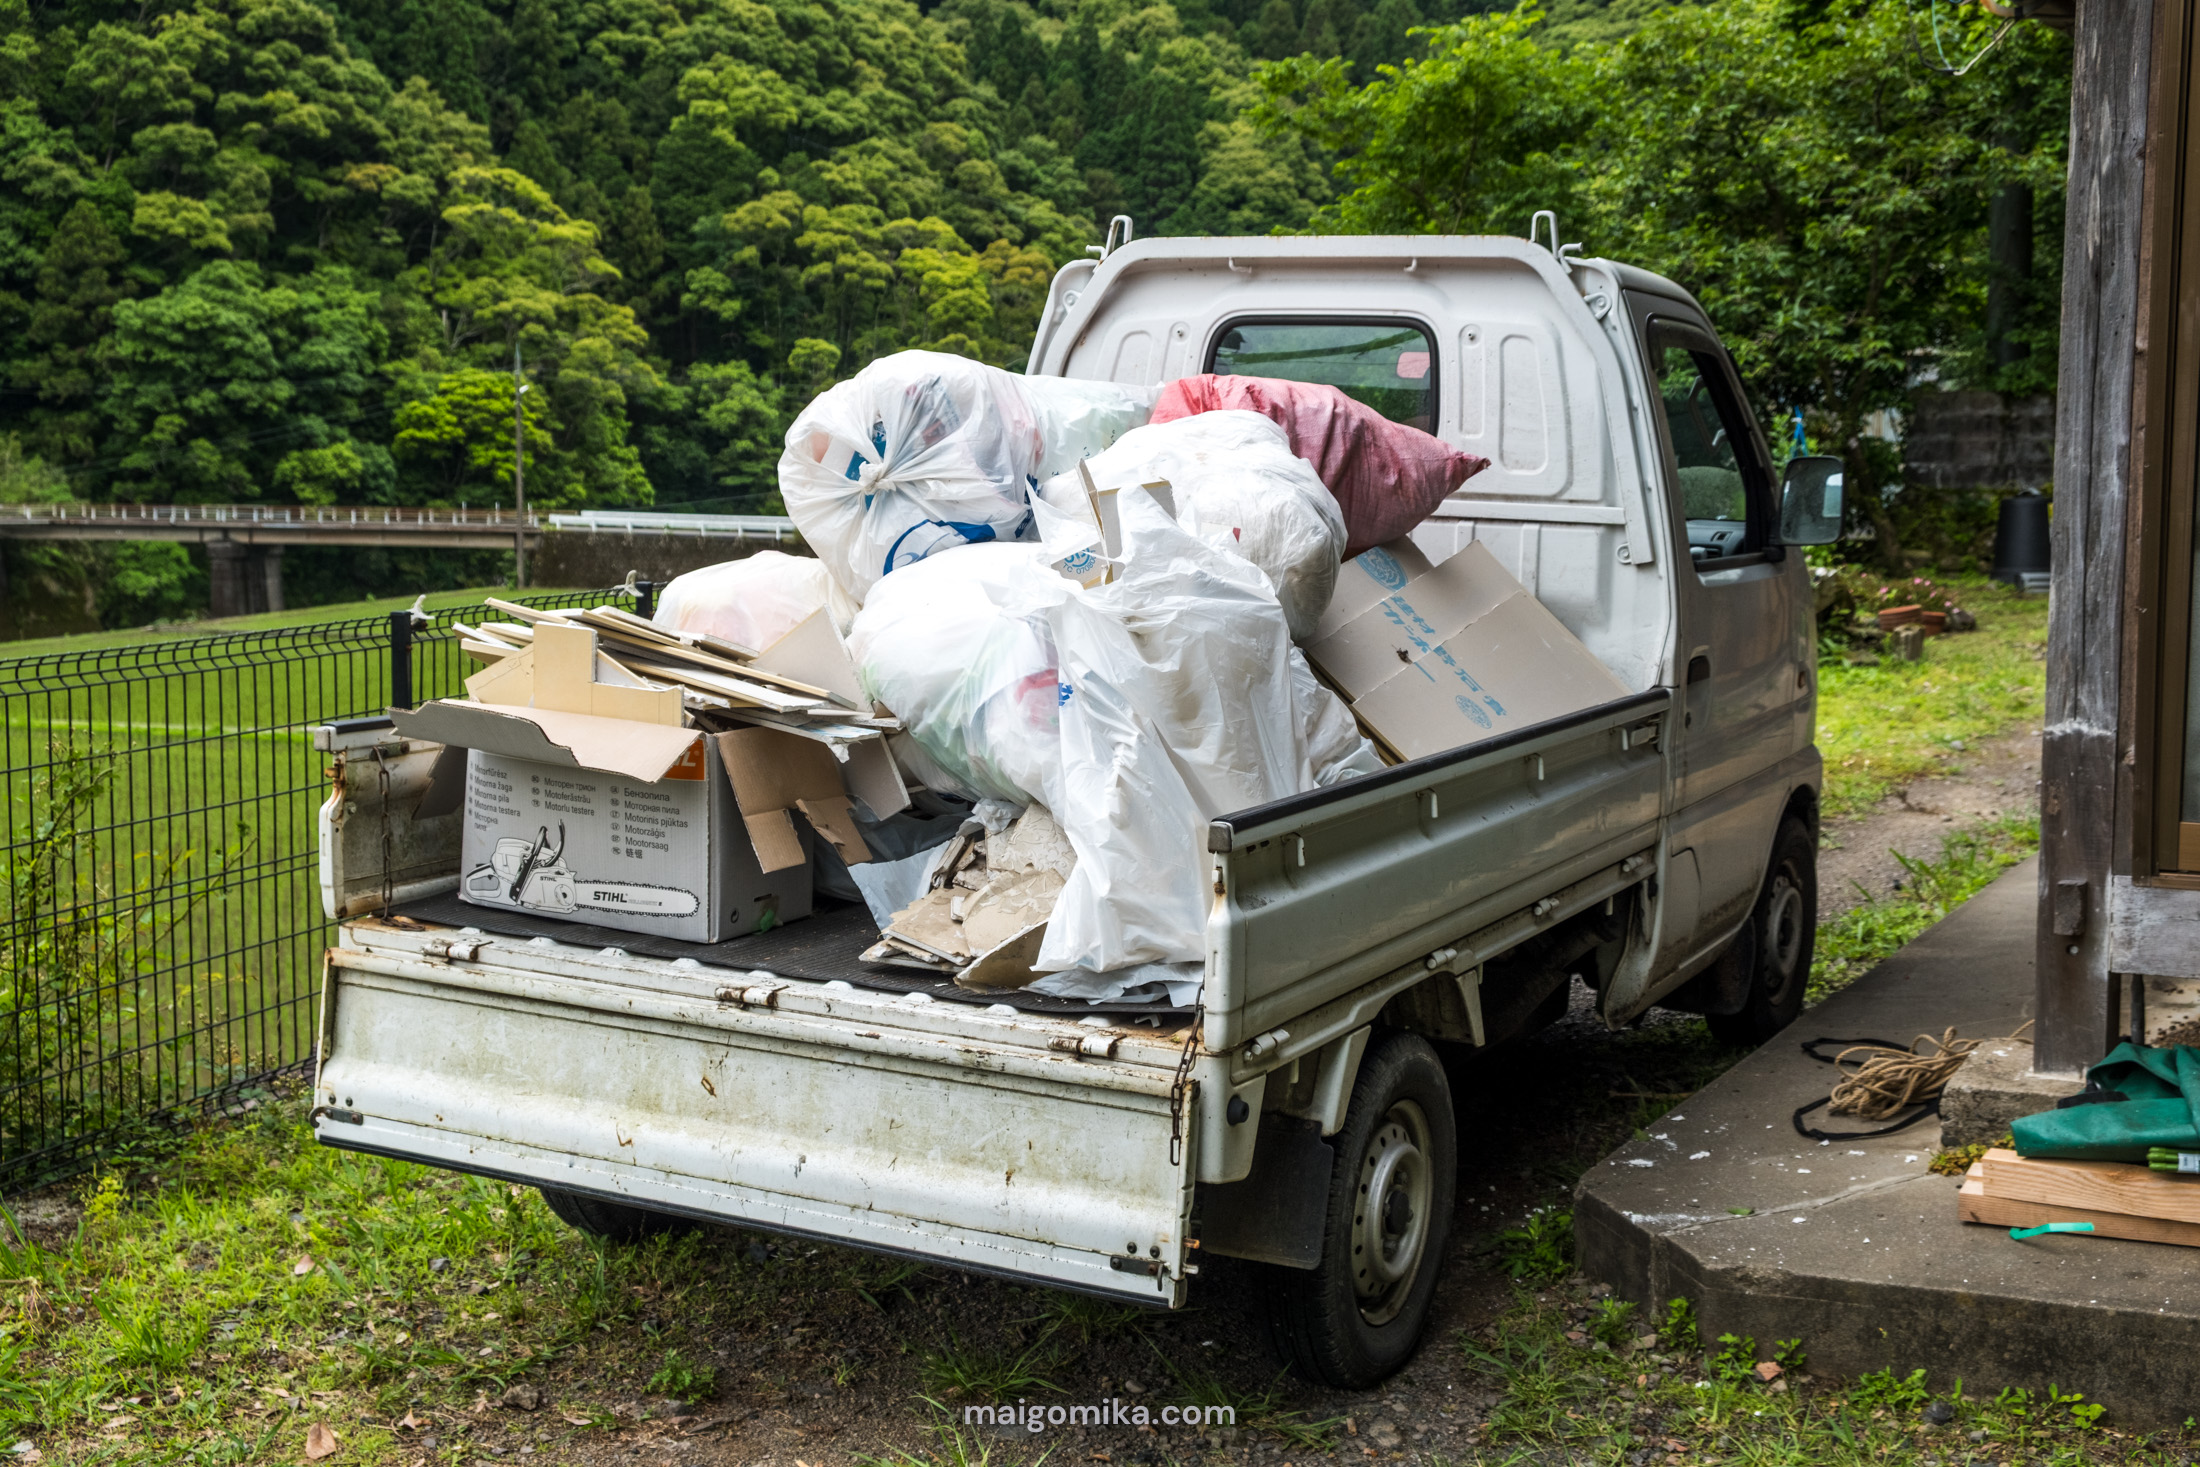
In Japan, a “dump run” usually means driving waste directly to a municipal incinerator or disposal facility, where fees are charged by weight. But if you’re imagining tossing bags into a skip and driving off… adjust expectations.
Here’s what a typical incinerator run looks like:
- Drive to the incinerator or disposal facility
- Drive your vehicle onto a scale
- Get out, sign paperwork, and show ID
- Declare exactly what kind of garbage you’re dumping
- Staff may inspect clear garbage bags
- Your vehicle is weighed with the garbage
- You’re directed inside to unload it yourself (bring gloves)
- Staff guide you on where each item goes
- Exit and weigh the vehicle again
- Pay the fee based on the difference*
*Waste is charged by weight, and fees vary by municipality. If it’s your first time, just tell the staff—they’ll explain the process and give you the pricing sheet.
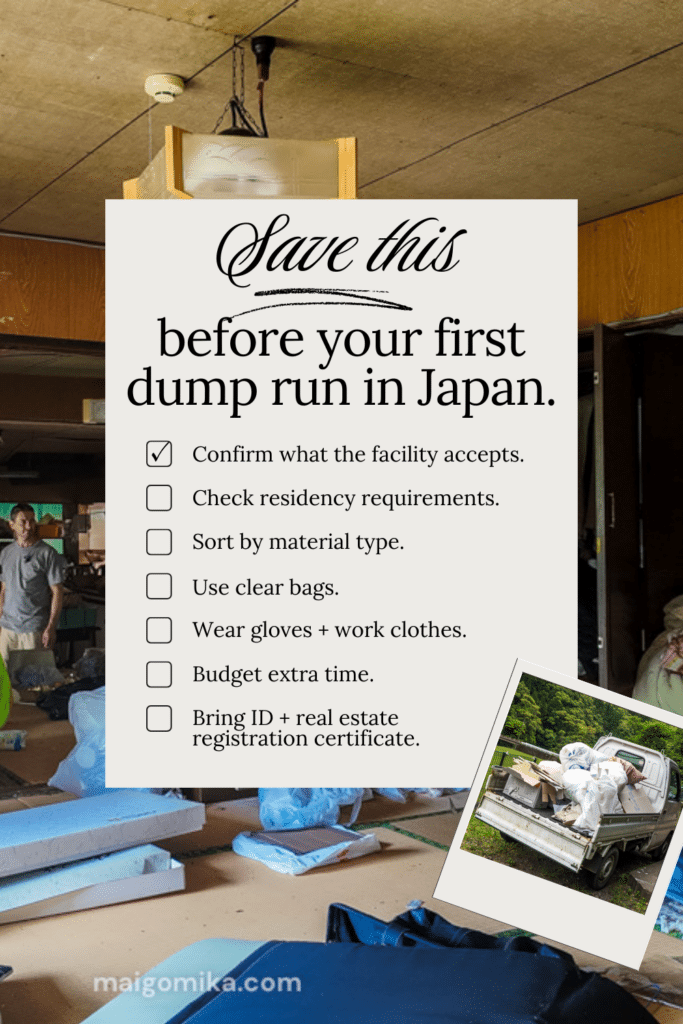
Before Your First Dump Run: A Quick Checklist
- Confirm the disposal site accepts your type of garbage
- Check whether proof of local residency is required
- Bring ID and, if needed, your real estate registration certificate (不動産登記権利情報)
- Sort garbage by one material type per run if possible
- Use clear bags unless told otherwise
- Bring gloves, masks, and clothes you don’t mind getting dirty
- Budget time — dump runs often take longer than expected
Municipal Garbage Pickup in Japan
If you’re dealing with smaller amounts, you can dispose of household trash through your regular municipal pickup. While you’re limited to smaller quantities per collection day, it can be a practical and cost-effective option for gradually clearing out smaller items.
Keep in mind that putting out anything that doesn’t qualify as standard household waste can result in fines or the garbage being left behind.
Burnables, non-burnables, and recyclables (PET and glass bottles, aluminum, tin cans, and paper) are put out on designated days, which we check with our local garbage collection calendar.
Most cities provide a color-coded map showing exactly which day each category is collected and which specific bags you are required to use. You can pick one up at the local city or ward office.
In our case, a pickup schedule looks like this:
- Burnable garbage is collected twice a week
- Recycling is often collected once a month
- Non-burnable garbage is collected once a year
- Oversized trash is often collected once a year or with advance notice to your local “Sodai Gomi Center.”
We also make sure to:
- Use designated municipal garbage bags (ours cost about ¥600 for 10 large bags)
- Place items at the designated spot (usually outside your house or apartment) by 8:00 AM on the scheduled morning.
- Use a covered garbage cage to keep animals out
Final Thoughts: Plan for Garbage Like It’s a Renovation Phase
Garbage disposal in Japan isn’t impossible — but it is something you need to plan for, especially if you in the midst of cleaning your akiya house. If you’re considering an akiya renovation, budget extra time and money for disposal. Your future self (and maybe even your wallet) will thank you!
If You’re Renovating an Akiya, You Might Also Find These Helpful:
- Everything You Need to Know About Akiya Houses in Japan
- The Shocking Reality Of Our First Year In An Akiya House
- We Bought a $4,000 Akiya in Japan. Here’s the Real Process (And Why It Took a Year)
Garbage Disposal FAQ
Garbage disposal in Japan isn’t difficult, but it is strict. Renovation waste must be sorted by material, taken to approved facilities, and, in many cases, proof of local residency is required.
When renovating a house in Japan, garbage must be sorted into strict categories and taken to approved disposal facilities. Waste is usually charged by weight, and different materials (such as burnable trash, metal, drywall, and appliances) may need to be taken to different locations. This means multiple dump runs over time, not a single cleanup day.
It can be. While regular household garbage is inexpensive, renovation and construction waste often costs more to dispose of. Fees vary by municipality and material type, and disposal costs can sometimes rival the price of renovation materials if you’re not prepared.
It depends on the municipality. Many disposal sites require proof of local residency, such as an ID with a local address. If you’ve recently purchased a house and your address hasn’t been updated yet, bringing your real estate registration certificate (不動産登記権利情報) may help — but policies vary, so it’s best to check ahead of time.
Most akiya renovations involve multiple dump runs spread over weeks or months. Because waste must be sorted by material and taken to different facilities, garbage disposal becomes an ongoing part of the renovation process rather than a one-time task.
The biggest mistake is treating garbage as an afterthought. Planning for disposal — including time, cost, sorting, and access requirements — early in the renovation process makes everything more manageable and helps avoid unexpected delays and expenses.
Want to save this for later? Pin on Pinterest!


Great article, very explanatory. I also love the accompanying youtube video on spring cleaning in Japan. My only real concern is that when you bought the house you overlooked the fact that there are powerless on a mountain top. Because EVERYONE knows that Godzilla follows the power lines from the countryside to Tokyo.
Oh crap! It that why the ground has been shaking so much? 😱 😂